Showing posts with label cake. Show all posts

Tuesday, 26 June 2012

Chocolate-Banana Marble Cake & Nutella-Banana Bread

I wonder who among my friends visit the public and national libraries these days? I haven't went in a long time until one afternoon after I visited Bras Basah Artfriend and I had some time to kill before the next appointment.

Gosh! To my pleasant surprise, I find our national library very complete. It has a wide collection of books, at least for the baking and cooking and food section. But, if something like baking and cooking already have a detailed collection, what can we say about other popular categories? Even better I suppose. I notice they have the latest titles that I cannot even find in fishpond.com. For those who are running out of things to do, I would strongly recommend a visit to the library. If you do not have time to read or have no intention of borrowing (lest the hassle of having to return it), it is also nice to grab a book, find a comfortable spot in the library and enjoy the pictures while you waiting for your appointment. 

Anyway, i got hold of book "the art and soul of baking". I have heard pretty decent good reviews and wanted to check it out before making a purchase. It was a heavy big book of recipes! love it. 

A simple, down-to-earth marbled cake got hold of my attention. I have never made a marbled bread but there are such detailed pictorial instructions that I feel I should give it a try and I did. 

The process was fun and the cake was chocolatey and bursting with banana flavours.


Chocolate Banana Marble Cake (adapted from "the art and soul of baking")
makes a 9in-by-5in loaf 

Ingredients:
  • 3 medium banana, very ripe, mashed with a fork, should yield about 1 cup
  • 1/4 cup buttermilk ( i used non-fat yoghurt)
  • 2 tsp vanilla extract
  • 2 cups sifted cake flour
  • 1 tsp baking soda
  • 1/2 tsp baking powder
  • 1/4 cup, unsifted unsweetened Dutch-process cocoa powder (I used Van Houten's)
  • 3 tbsp boiling water
  • 1 1/2 stick unsalted butter, soften
  • 1 cup sugar (I used190g)
  • 2 large eggs, room temp, lightly beaten

Method:
  1. Preheat oven to 176degC. Butter a 9in-5in loaf pan.
  2. Add buttermilk and vanilla to the cup of mashed banana
  3. sift cake flour, baking powder and soda into a medium bowl. whisk to blend well. set aside
  4. dissolve cocoa powder in the boiling water and stir until a smooth paste is formed. add extra water if it is too thick
  5. Beat butter and sugar, at medium high speed until very light, and fluffy (4-5min)
  6. Turn speed to medium and add eggs one by one
  7. Add the flour mixture in three additions, alternating with banana-buttermilk mixture. DO NOT over-mix. It is okay to see patches of flour.
  8. transfer half the batter into another bowl and add the cocoa paste. Mix well, gently but thoroughly.
  9. Drop alternating spoon of dark and light batters into prepared pan. Create marbling effect by using a spoon to gently turn the batter over in 3 places over the length of the pan.
  10. Bake the cake for about 55-65min ( I baked mine for about 80min). Remove from oven and let cool. When cooled, slice gently using a serrated knife.

After I made this, my cousins suggested Nutella-Banana cake. What can I say more about Nutella? It has always been a winner. 


Nutella-Banana Chocolate Cake

Same recipe as above except that the cocoa paste was replaced with about 120g of Nutella.

Sunday, 27 May 2012

Japanese Matcha Munavalgekook

this is something that Dear saw on Foodgawker (my favorite iPhone app!) and requested for. it was a very simple cake but required quite alot of eggs whites. I had problems using up the egg yolks after that and ended throwing some away - yes, it was wasteful. I should have been more curious to find out what "Munavalgekook" means before baking this. that's me, i usually "skip" the words that i cannot pronounce, when reading in silence. it's subconscious. I wonder if anyone of you is like me. ...The awkward moment when you wrongly pronounce the name of a lead character in a popular book when excitedly discussing about the character with another fan of the book...


anyway, the word "Munavalgekook" is Estonian for "egg white cake". unlike angel cakes  which also use only egg whites and contain little/no fat, munavalgekook has added fat and is taste buttery and moist. coupled with the aroma of matcha powder, i think it is wonderful as as a tea-time snack with any brewed tea!


I chose to bake this cake in a bundt pan. I love making bundt cakes as they already look pretty on its own. 


Japanese Matcha Munavalgekook
(adapted from closetdomesticbunny)


Ingredients:

  • 6 large egg whites
  • 2tbsp caster sugar
  • 100g butter, melted and let cool
  • 150g caster sugar (original recipe called for 200g)
  • 160g self-raising flour
  • 2tbsp of cornflour
  • 1tsp of baking powder
  • 1tbsp matcha green tea powder (could add 1/2tsp if desired)

Method:
  1. Line your baking tin and pre-heat oven to 180°C.
  2. Mix the dry ingredients together and sift a few times until ingredients are all mixed thoroughly.
  3. Beat the egg whites and 2 tbsp of sugar with a hand mixer until pale and foamy, or if you'd like the cake fluffier until soft peaks form.
  4. Sift the dry ingredients into the beaten egg whites. Fold with a spatula gently.
  5. Add the melted (but cool) butter and mix gently.
  6. Pour into the baking tin and bake for 30-40 minutes. Mine baked for about 45 min.
  7. let cook in the bundt for 5min and transfer to cool on a cooling rack


Saturday, 18 February 2012

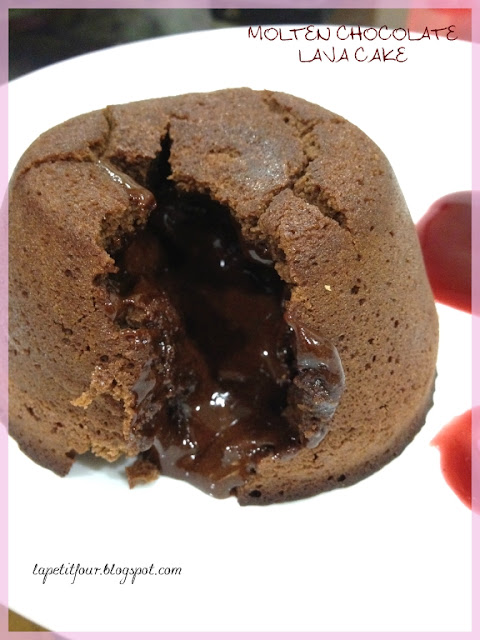
Molten Chocolate Lava Cake - a Valentine Sweet Treat

i love this dessert - anytime! already planned to make this for Dear on Feb 14th since sometime ago. 


hmmm. i wonder, actually, if this makes him or me happy, since I'm the one who likes it! this brings me to another thought which has been baffling me for some time. that is, sweet desserts are almost a must for Valentine's day celebration and baking sweet cookies/cakes/chocolates seem like a popular gift from girls to boys. but the thing is, it is the girls who likes those sweet treats, not the boys right? so.... why??? i suppose baking needs much effort and that's why... hope the boys appreciate those efforts from we girls!


anyhow, here's the much-liked molten chocolate lave cake..


Molten Chocolate Lava Cake (adapted from cake-o-cake.blogspot)


Ingredients (i used half the recipe for 2 ramekins)


4 oz dark chocolate, melted
4 oz semi-sweet chocolate, melted
4 tbsp salted butter, softened
1/3 cup cake flour
1/3 cup granulated sugar
3 eggs


Method:


1. mix the melted chocolate together
2. cream sugar and butter. add eggs one at a time, incorporating between each additions
3. add flour and mix until just combined
4. using a rubber spatula, stir in the melted chocolate into butter-egg-sugar-flour mixture. stir in big circular strokes
5. butter the ramekins generously 
6. fill the ramekins to the top with the batter
7. bake at preheated oven at 190degC for 15min or until edges are firm but centre still soft. entire top should be even in color.
8. cool for 10min before un-molding
9. un-mold the cake by quickly inverting the ramekins and allow the cake to slide out quickly
10. decorate as you wish


i was too excited in "presenting" the "gift" to Dear that i did not take more pictures of it....

Lemony Madeleines

the humpy cakes! so, i called them. distinctive to madeleines are humps on shell-like looking butter cakes. the first madeleines i had were the ones from Delifrance. never knew the actual names of the cakes until much later when i actually learnt to read food names first before buying the food. when i was younger, madeleines were common sight at my grandma's place because my aunties and uncles often frequent Delifrance, which was then quite hip and "class". with the dwindling number of deliverance outlets in Singapore, i think then-popular cafes are being quickly overtaken by more "artas, baristas-ish places and unique cafes like PS Cafe, the Marmalade Pantry, Wild Honey, etc. 


it has been a while since i ate madeleines. few weeks ago when i was researching on french recipes, i came across this classic madeleine recipe (from Julia Child of course!) and decided to give it a try. verdict? really awesome! the additions of lemon zest and lemon juice were simply amazing as they balanced the buttery taste of common madeleines sold in those chain bakeries, making you want for more. 


as it was my first attempt on madeleines, i was rather reluctant to buy the real madeleines molds which are quite costly. i baked this batch of madeleines using existing little cake molds that i have at home. different look but the same great taste! 


Lemony Madeleines


Ingredients:

  • 2 ---------------------------- large eggs, beaten
  • 140g ----------------------- granulated sugar
  • 125g ----------------------- all purpose flour
  • 113 g ---------------------- unsalted butter (plus 1 tbsp but greasing the molds)
  • 1/8 tsp --------------------- salt
  • 1 tbsp ---------------------- flour
  • 2 tsp ----------------------- vanilla essence
  • 1 tbsp ---------------------- grated lemon zest
  • 3 drops -------------------- lemon juice

Method:


1. combine flour and sugar in a mixing bowl and add three quarters of the eggs. beat vigorous and form into a heavy cream. set aside for 10min
2. boil all the butter until very slight brown. take out 1 tbsp of the butter and mix well with the 1 tbsp of flour. set side this mixture
3. cool the hot melted butter over cold water but ensure that butter still remains a liquid. beat the remaining egg into the batter and stir in the cooled liquid butter. stir in salt, lemon zest and lemon juice. cover batter and refrigerate it for at least one hour.
4. grease the molds with the butter-flour mixture from step 2
5. preheat oven to 190degC. using a spoon and rubber spatula, drop a rounded tablespoonful of batter into each madeleine cup. do not spread batter to fill the mold. repeat with the remaining batter and mold. 
6. bake in the middle rack for 20 min or until slightly brownish
7. unfold and cool on a rack with hump side up


enjoy!


*off to buy the real madeleines mold! ;)

Saturday, 24 December 2011

Chocolate Bundt Cake

this is actually a pound cake in a bundt mold. wanted to try out something in preparation for Christmas! Hohoho!


sadly, the pictures cannot really show how great the cake actually tasted. most of the comments i gathered were really positive. to perfect it, go with vanilla/chocolate sauce or vanilla ice cream..


to those who have tried it, i really hope you will crave for more, because i shall be baking more of it for others to try. one of my most satisfied bakes till date. ;)


Chocolate Bundt Cake (adapted from Tish Boyle's The Cake Book)


Ingredients:


181g ---------------------- all-purpose flour
57g ----------------------- cake flour
92g ----------------------- dutch-processed cocoa power
2 1/4 tsp ----------------- baking powder
1/2 tsp ------------------- salt
340g --------------------- unsalted butter
500g --------------------- granulated sugar (i used only 380g)
4 large eggs
2 tsp ---------------------- vanilla extract
242g --------------------- sour cream (i replaced about 1/5 of it with plain yoghurt)


Method:


1. preheat oven to 163degC. grease the inside on a 10-in bundt pan and dust with flour
2. sift together flour, cocoa powder, baking powder and salt in a medium bowl and set aside
3. using an electric mixer, at medium speed, beat butter until very creamy (~2min). gradually beat in the sugar. increase speed of electric mixer to medium high and beat the mixture until well-blended and light (~4min)
4. reduce speed to medium. beat in the eggs one at a time, mixing well after each addition
5. stir the vanilla extract into the sour cream.
6. now add the dry ingredient into the butter mixture in 3 additions, alternating with the sour cream mixture in 2 additions, mixing until just well-blended (note: the flour mixture is prone to splatter during mixing. use a splatter shield on the mixing bowl if you have)
7. scrape the batter into the prepared pan and smooth the top
8. bake the cake for 75 mins, or until a cake tester inserted into the centre comes out clean. cool the cake in the pan on a wire rack for 15minutes. after that, invert the cake onto the rack and let it cool completely


Tuesday, 4 October 2011

the cheesecake factory oreo cheesecake

i have never been to The Cheesecake Factory.. the only cheesecake speciality store i ever been to is Singapore's cheesecake cafe located at Siglap. from what i remember, the cheesecake is not particularly good, but it is nice enough..  i actually like cheesecakes from Coffee Bean & Tea leaf. they serve very decent blueberry cheesecake...

while i was searching for the original new york cheesecake recipe for two of friends' birthday (yes they share the same birthday, exactly.. what a small world..), i chanced upon this oreo cheesecake recipe from Copykat.com. this website is super interesting for it shares secret recipes of famous foods, mostly those in US.

when i saw the recipe, i knew instantly that it would be the perfect birthday cake for them.

from buying the ingredients to finally getting a taste of it, the entire process took me about 28 hours... as the saying goes, you reap what you sow. what can i say more? although i have never tasted the cheesecake factory's signature oreo cheesecake, i think this can also sweep cheesecake lovers off the ground...

The Cheesecake Factory's Oreo Cheesecake (it is that good..)


Ingredients (i converted the measurement to metric units)

680 g ------------ cream cheese, room temp
226 g ------------ sour cream (i used yoghurt), room temp
5 ----------------- large eggs, room temp
5 ----------------- Oreo cookies, chopped coarsely
10 ---------------- Oreo cookies, chopped coarsely (for the topping)
125 g ------------ castor sugar
31 g ----------- plain flour
2 tsp ----------- vanilla
1/4 tsp --------- salt

25 -------------- Oreo cookies, finely chopped (for the base)
2 tbsp --------- melted butter


Method:

1. mix melted butter with finely chopped cookies and press into the bottom of 9-in spring form pan and 1.5in up the sides, set aside
2. beat cream cheese on low until fluffy
3. slowly add sugar and continue beating until well mixed
4. add eggs one at a time and continue to beat until well blended
5. measure the vanilla, salt and flour and pour into cream cheese- egg mixture and beat until smooth
6. add sourcream and beat well
7. stir in the coarsely chopping cookies with a spoon
8. pour cream cheese mixture into the prepared pan and sprinkle the other set of coarsely chopped cookies on the top of the cream cheese
9. baked in a preheated oven at 165degC for 1hr 15min.
10. after that, keep oven door open and leave the cake inside for another hour
11. remove cake from oven and let cool until cool enough to be chilled. refrigerate for 24 hours


it is a looong process, but completely worth it. i am sure this is the ONLY oreo cheesecake recipe i will ever use..


Monday, 3 October 2011

Pandan Chiffon Cake II

as mentioned in my earlier post, i will bake another PCC and here it is. this recipe is more tedious but it is completely worth it.

see the "holes" in my PCC? the result of over beating; too many air bubbles formed in the process..

Pandan Chiffon Cake II (adapted from ieatishootipost)


Ingredients:

1 tsp ------------ pandan paste (original recipe uses fresh pandan leaves which i will the next round)
90-100 g ------- coconut cream (original recipe uses fresh coconut milk)
50 g ------------ caster sugar
60 g ------------ egg yolks (about 4 egg yolks)
100 g ---------- cake flour
60 g ----------- canola oil
1/4 tsp -------- salt
1 tsp ---------- baking powder

180 g --------- egg white (about 4-5 egg whites)
1/2 tsp ------- cream of tartar
50 g ---------- caster sugar

Method:

1. blend pandan paste into coconut milk. set aside
2. beat egg whites with cream of tartar until frothy. add sugar slowly until stiff peaks form. set aside
3. beat egg yolks with sugar until pale and creamy
4. add pandan-coconut milk mixture, oil and salt and whisk until well mixed
5. sift in cake flour and baking powder into yolk mixture and mix it well
6. add the beaten egg whites, one-third at a time, to the egg yolk mixture
7. after each addition, mix in the direction just used for whisking the egg whites, scraping bottom of bowl and lifting batter upwards just until evenly mixed.
8. lift bowl nd bang bowl hard against the worktop a few times to remove air bubbles.
9. pour batter into 21-cm chiffon tin, very slowly, so that more air bubbles are released.
10. bake cake in bottom of preheat oven of 180degC till risen (about 15 min)
11. place a baking tray on the top of oven (to block off heat from top) and continue to bake for another 25 min or so
12. remove cake from oven and invert it onto a rack to cool. after cooled, cut cake out from tin.


somehow, the sides of my PCC never browns and i wonder if it's got to do with my baking tin.. (anti-burn property???)


Tuesday, 27 September 2011

Pandan Chiffon Cake 1

pandan has a nice aroma and is popularly used in many Asian and Chinese desserts. pandan's best friends are coconut milk and kaya..

Dear's family (of indonesian background) makes the best pandan cake! when i was first introduced to their pandan cake, i was expecting a chiffon cake but to my surprise, it was a dense pandan cake. nothing like the local pandan chiffon cake but i really love it! bengawan solo and subway niche both sell "kaya cake", which is quite similar to Dear's family pandan cake.

unfortunately, i dont get to eat Dear's pandan cake often. only when his mommy visits singapore then i get to enjoy it. since the mid-autumn festival, i have been craving for pandan cake. pandan chiffon cake seemed like the most logical choice of bake since recipes are easily available. BUT, from my simple research, i realised that it takes a LONG trial-and-error process to master the BEST pandan chiffon - something insanely fragrant, moist but light.... interestingly, i found out that prima deli (singapore) sells two types of pandan cakes - the normal one and the premium one... the latter costs about twice the price of the former, and just about the same as that of bengawan solo... by the way, bengawan solo apparantly sells the best pandan cake in singapore...

i really believe that there is a secret ingredient AND a secret technique to making the best pandan chiffon. while i'd used pandan paste and storebought coconut milk here, i know nothing beats using real stuff like real pandan leaves (blended and essence extracted) and freshingly squeezed coconut cream.

well, you might have noticed that the post title is pandan chiffon cake ONE. yes, i believe i will be pursuing the pandan-chiffon perfection..

Pandan Chiffon Cake (adapted from Bisous A Toi)


Ingredients:

100 ml ------------- coconut cream
1tsp ---------------- pandan paste
100 g -------------- cake flour
1 tsp --------------- baking powder
50 g ---------------- canola oil
4 ------------------- egg yolks
100 g --------------- castor sugar (divided)
one pinch of salt

5 ------------------ egg whites
1/4 tsp ----------- cream of tartar

Method:

1. preheat oven to 170degC
2. mix pandan paste into coconut milk. mix well
3. add oil, yolks, 50g sugar and salt into the mixture from 2 and mix well
4. sift in flour and baking powder and whisk using a handwhisk until smooth. set aside
5. using an electric mixer, beat egg whites and cream of tartar until frothy.
6. add the remaining 50g sugar until beat until stiff peaks (meringue forms)
7. transfer 1/3 of the meringue into the coconut-flour mixture and mix well using a handwhisk
8. slowly fold mixture 7 into the remaining meringue until well incorporated
9. pour final batter into an ungreased 18-cm chiffon pan and bake for about 50 min


just as i expected, this is quite a big gap from my ideal pandan chiffon. much room for improvement. this cake was fairly fragrant and light but not moist. i might have over-baked it.

just keep trying!

Thursday, 22 September 2011

coffee buttercream layer choco-sponge

it is quite easy to figure that i had some coffee buttercream left over from my previous bake and hence this coffee buttercream layer sponge cake. turns out that the coffee buttercream goes even better with these sponge layers.........

i like how one of my friends described this creation - awesome centre cake.. *delighted*


Coffee Buttercream Layer Choco-Sponge 

Ingredients:

choco-sponge cake (adapted from Bisous A Toi)

6 --------------- eggs
110g --------- sugar
1 tsp --------- baking powder
1 tbsp ------- ovalette
113 g ------- cake flour
2 tbsp ------- milk powder
1 tsp --------- chocolate paste
1/4 tsp ------- salt
113 g -------- unsalted butter

coffee buttercream (pls see previous entry on coffee walnut whip cupcake; chopped walnuts are optional but i added chopped walnuts and choco-rice to the coffee buttercream)

Method:

1. Sieve cocoa powder, flour, baking powder, salt and milk powder into mixing bowl. add in the rest of the ingredients except melted butter. Beat at high speed for about 7 mins or until fluffy
2. pour in melted butter and stir lightly until well combined
3. bake in preheated oven at 175degC for about 15 min
4. Remove from oven and let cool
5. divide cake into two equal proportions
6. spread a layer of coffee buttercream on top of one of the cake layers and stack the other one on top of it.
7. slice and serve

and there you have it! chill and serve if you like. it tastes as good.


Thursday, 15 September 2011

lemon blueberry loaf - smurfilicious

this is an overdue post. it has been more than a week since i last baked. Twas a hectic week for me.

i was thrilled when i won preview tickets to Smurfs 3D two weeks ago. Smurfs 3D was nothing more than a kid's movie but the Smurfs are really cute.. seeing those Smurfberries prompted me to bake something with blueberries and so i did. 

blueberries are one of my favourite fruits and i can easily finish one punnet in less than ten minutes by myself. They appear to be extremely good for the eyes too, hence those berry essences as nutritional health products. hmm.. i wonder exactly how many blueberry goes into one bottle of Brand's berry essence and GNC's. GNC's berry essence drink tastes wonderful. you should try it too!

nutrition facts aside, blueberries make excellent bakes and desserts. i think many people enjoy blueberry bakes such as blueberry muffins, blueberry scones, blueberry yoghurt, blueberry cake, jams, tarts....the list goes on..

it was coincidental that i had lemons in my fridge and they pair really well with blueberries. so there you got it - lemon blueberry loaf cake. i like that i could enjoy fresh blueberries in the fluffy-buttery cake, embodied with a nice citrus flavour. the only thing i didnt quite like was perhaps using blueberries that were too big; it made slicing slightly more difficult.

Lemon-Blueberry Loaf Cake
(adapted from Joy Of Baking.com)


Ingredients

195 gm -------------------- all-purpose flour
1 tsp ------------------------ baking powder
1/4 tsp --------------------- salt
85 gm ---------------------- unsalted butter, room temperature
150 gm -------------------- granulated white sugar
2 ----------------------------- large eggs
1/2 tsp --------------------- pure vanilla extract
1 tbsp ------------------------ grated lemon zest (outer yellow skin of the
lemon)
120 ml ----------------------- milk
1 cup ------------------------- fresh blueberries

Lemon Glaze: (i omitted this)
50 grams -------------------- granulated white sugar
2 tbsp ------------------------- fresh lemon juice

Method:
1. Preheat oven to 180degC and place the oven rack in the center of the oven. Butter (or spray with a non stick vegetable spray) the bottom and sides of a loaf pan 23 x 13 x 8 cm
2. In a separate bowl, whisk together the flour, baking powder and salt.
3. In the bowl of your electric mixer, or with a hand mixer, beat the butter until softened (about 1 minute). Add the sugar and continue to beat until light and
fluffy. Add the eggs, one at a time, beating well after each addition. Scrape down the sides of the bowl as needed.
4. Beat in the vanilla extract and lemon zest.
5. With the mixer on low, add the flour mixture (in three additions) and milk (in two additions) alternately, starting and ending with the flour. Mix only until
combined.
6. Gently fold in the blueberries.
7. Scrape the batter into the prepared pan and bake for about 55 to 65 minutes, or until the bread is golden brown and a toothpick inserted in the center comes
out clean.
8. Meanwhile, in a small saucepan, bring the 50 grams of sugar and the 2 tablespoons of lemon juice to a boil, stirring until the sugar dissolves.
9. When the bread is done, remove from oven and place on a wire rack. Pierce the hot loaf all over with a wooden skewer or toothpick and then brush the top
of the loaf with the hot lemon glaze.
10. Cool the loaf in the pan for about 30 minutes then remove from pan and let cool completely on a wire rack.


This bread is best served on the day it is made.

Friday, 26 August 2011

Very BaNANA loaf

Banana loaf, banana cake, banana bread... what's the difference? Based on my little research, people use the terms interchangeably. But recipes for cake, bread and loaf differ to some extent. Banana cakes tend to call for more butter and oil as compared with banana bread and loaves. Banana cakes are also "fluffier" and taster richer than banana breads. Regardless, banana recipes are quick, simple and popular with beginners. They are hard to go wrong, unless you like unripe bananas......

There are easily over hundreds of banana cake/loaf/bread recipes available in recipe books and on the internet. I adapted my recipe from one called BEST EVER BANANA BREAD from allrecipes.com. Until I tried all the banana recipes in the world, there is no way to prove is the best ever banana bread. But I can tell you, this is a fail-proof recipe, not matter how you modify it.

(It is a pity that I did not have my camera with me when I baked this banana loaf. had to turn to a dinosaur 3G iPhone I inherited from Dear. with a 2 megapixel camera only, the pictures are really quite a blur)

ba-NANA loaf

Ingredients
  • 220 g plain flour 
  • 1 tsp baking soda 
  • 1/2 tsp salt 
  • 1/2 - 1 tsp ground cinnamon (optional) 
  • 110 g caster sugar 
  • 110 g packed brown sugar (okay to use all caster sugar if you have no brown sugar) 
  • 2 Eggs, light beaten 
  • 1/2 - 1 tsp vanilla essence (optional) 
  • 120 ml  vegetable oil 
  • 80 ml plain yoghurt (original recipe calls for buttermilk and if using buttermilk, increase sugar to 300g) 
  • 3 Large bananas, smashed (always use Dole Bananas! =) 
  • (You may add pecan or walnuts) 
Method
  1. Preheat oven to 165degC. Grease and line a 9-by-5 in loaf tin. 
  2. Beat eggs lightly with vanilla essence 
  3. Blend together the smashed bananas, yoghurt, and oil and egg-vanilla mixture 
  4. Sift together the flour, sugars, cinnamon, baking soda and salt 
  5. added 4 into 3 and mix well 
  6. Pour mixture into prepared tin and bake in oven for about 1hr 20min or until a toothpick comes out clean when inserted. 
Simple as it may be, it was very well-received. I am very heartened by the comments given by my friends. *big grin*

I will definitely make it again!


Saturday, 20 August 2011

Souffle Cheesecake - an original Japanese recipe

Haven’t had the Fiesta cheesecakes in a while. Kind of craving for it... all along, i prefer Japanese cheesecakes to American ones cos I like them light and fluffy...

This recipe was given to me (and a few other friends) by a girlfriend who loves the Japanese culture and can speak Japanese very well. Originally written in Japanese, my friend super kindly translated the recipe into English for us. It is an original Japanese cheesecake!

Till date, this is one of my most treasured recipes - easy to follow instructions with many useful personal tips. And best of all, it never fails.

Thanks Michelle!

Soufflé Cheesecake

Ingredients
  • 250 g Cream Cheese, softened at room temperature 
  • 80 g Granulated Sugar, divided 
  • 3 Egg Yolks
  • 2 Egg White 
  • 80 g Fresh Cream 
  • 20 g Corn Starch 
  • 1.5-2 tbsp Lemon Juice 
Method
  1. Using a hand whisk, whisk the cream cheese till smooth 
  2. Add half the amount of the granulated sugar and whisk well 
  3. Add the egg yolk one at a time and whisk well after each addition 
  4. Add in the fresh cream, cornstarch and lemon juice and whisk well. Set aside 
  5. In another mixing bowl, add a pinch of the remaining half of the sugar into the egg white 
  6. Using an electric mixer, whisk the egg white until it turns white 
  7. Add the remaining sugar in 2-3 additions. Whisk well after each addition until stiff peaks form. This is the meringue. 
  8. Preheat oven to 170DdegC 
  9. Using a hand whisk, whisk half of the meringue into the cream cheese mixture. Whisk well but gently. 
  10. Using a spatula, gently fold in the rest of the meringue - in 2-3 additions, into the cream cheese mixture. The mixture is done when the meringue cannot be seen (well folded) 
  11. Pour the final mixture into a lined 18-cm round cake tin and bake at 170degC for 1 hr until cake is done, i.e. insert a toothpick and it should come out clean (I needed to bake mine for 1.5hrs) 
  12. Remove cake from the oven and cool in tin for 10 min. remove from tin and cool completely on a cool rack 


Sunday, 14 August 2011

Homestyle Butter Cake for Grandma


Grandma said she likes butter cakes because they smell great and are moist enough. My mum had been asking me for quite some time to bake a butter cake for Grandma. Why did it take me so long? Simply because I THOUGHT butter cake is too simple and not challenging. What can go wrong? But I was wrong.

In search of an old-styled butter cake recipe to impress Grandma, I became confused by the recipes for "butter cakes" and those for "pound cakes". My mini research found pound cakes containing less butter to flour ratio and butter cake recipes call for milk which pound cake recipes don’t. I also suspect that some people had used the terms butter cake and pound cake interchangeably.

Regardless, my gut feel was to use a recipe with more butter. It seems to me that our grandparents' generation really enjoys more butter than us - after all, bread toast with butter and sugar, butter roasted coffee beans, traditional butter cake with butter cream......

Happily, I baked a home-style butter cake for Grandma. I was so sure she would be full of praises for me....
Butter Cake

Ingredients
  • 250 g butter, softened 
  • 1 tsp vanilla extract 
  • 260 g caster sugar 
  • 3 eggs 
  • 335 g self-raising flour 
  • 180 ml milk 

Method
  1. Preheat oven to 180degC. Grease deep 22-cm round cake pan. (I used rectangular loaf tins instead, which is why there were cracks on the cake surface) 
  2. Beat butter and sugar using an electric mixer until light and fluffy. Stir in sifted flour and milk, in two batches. 
  3. Spread mixture into pan and bake for about 1 hour. Stand in cake pan for 5 min before turning, top side up onto a wire rack to cool. 
The outcome: 

Dear said: "moist and nice butter fragrance!"
Grandma: "not bad........"
My mum said it was not spongy enough...
Then, I knew it's gotta be pound cake that Grandma likes....