Showing posts with label chocolate. Show all posts

Tuesday, 26 June 2012

Chocolate Chip Cream Scones

Another breakfast food. Second attempt at scones. A different kind of scones. There are just so many kinds of scones and I shall try until I find the one I like the most. The first scones I made were buttermilk scones, which I had replaced the buttermilk with yoghurt. Those plain scones are ideal with cream and jam.

The ones here are cream scones. I think they tasted delicious! I liked them so moist and their textures. With Hershey's chocolate chips embedded everywhere, they'll definitely make your day. 


Chocolate Chip Cream scones (adapted from the food librarian)
makes about 15 4-in round scones


Ingredients:
  • 250g all-purpose flour
  • 56g granulated sugar
  • 2 1/2 tsp baking powder
  • 1/4 tsp salt
  • 113.4g butter (cold, cut into pieces)
  • 1 cup (8 oz) heavy whipping cream (cold) ( I used 3/4 cup cream and 1/4 cup non-fat yoghurt)
  • desirable amount of miniature chocolate chips (depending on preference)
Topping (I omitted)
  • 1 egg, lightly beaten
  • 2 tbsp sanding sugar or granulated sugar
Method:
  1. Preheat over to 218degC
  2. Mix together dry ingredients. 
  3. Cut in the butter until you get a coarse-meal crumbs like consistency. 
  4. Add whipping cream and chocolate chips. Blend together quickly. Do not overmix.
  5. Shape into a round or square. 
  6. Brush with egg wash. Sprinkle with sugar. (I did not)
  7. Cut into shapes. Place on parchment or Silpat covered baking sheet.
  8. Bake for 14-16 minutes until golden brown and delicious.


Chocolate-Banana Marble Cake & Nutella-Banana Bread

I wonder who among my friends visit the public and national libraries these days? I haven't went in a long time until one afternoon after I visited Bras Basah Artfriend and I had some time to kill before the next appointment.

Gosh! To my pleasant surprise, I find our national library very complete. It has a wide collection of books, at least for the baking and cooking and food section. But, if something like baking and cooking already have a detailed collection, what can we say about other popular categories? Even better I suppose. I notice they have the latest titles that I cannot even find in fishpond.com. For those who are running out of things to do, I would strongly recommend a visit to the library. If you do not have time to read or have no intention of borrowing (lest the hassle of having to return it), it is also nice to grab a book, find a comfortable spot in the library and enjoy the pictures while you waiting for your appointment. 

Anyway, i got hold of book "the art and soul of baking". I have heard pretty decent good reviews and wanted to check it out before making a purchase. It was a heavy big book of recipes! love it. 

A simple, down-to-earth marbled cake got hold of my attention. I have never made a marbled bread but there are such detailed pictorial instructions that I feel I should give it a try and I did. 

The process was fun and the cake was chocolatey and bursting with banana flavours.


Chocolate Banana Marble Cake (adapted from "the art and soul of baking")
makes a 9in-by-5in loaf 

Ingredients:
  • 3 medium banana, very ripe, mashed with a fork, should yield about 1 cup
  • 1/4 cup buttermilk ( i used non-fat yoghurt)
  • 2 tsp vanilla extract
  • 2 cups sifted cake flour
  • 1 tsp baking soda
  • 1/2 tsp baking powder
  • 1/4 cup, unsifted unsweetened Dutch-process cocoa powder (I used Van Houten's)
  • 3 tbsp boiling water
  • 1 1/2 stick unsalted butter, soften
  • 1 cup sugar (I used190g)
  • 2 large eggs, room temp, lightly beaten

Method:
  1. Preheat oven to 176degC. Butter a 9in-5in loaf pan.
  2. Add buttermilk and vanilla to the cup of mashed banana
  3. sift cake flour, baking powder and soda into a medium bowl. whisk to blend well. set aside
  4. dissolve cocoa powder in the boiling water and stir until a smooth paste is formed. add extra water if it is too thick
  5. Beat butter and sugar, at medium high speed until very light, and fluffy (4-5min)
  6. Turn speed to medium and add eggs one by one
  7. Add the flour mixture in three additions, alternating with banana-buttermilk mixture. DO NOT over-mix. It is okay to see patches of flour.
  8. transfer half the batter into another bowl and add the cocoa paste. Mix well, gently but thoroughly.
  9. Drop alternating spoon of dark and light batters into prepared pan. Create marbling effect by using a spoon to gently turn the batter over in 3 places over the length of the pan.
  10. Bake the cake for about 55-65min ( I baked mine for about 80min). Remove from oven and let cool. When cooled, slice gently using a serrated knife.

After I made this, my cousins suggested Nutella-Banana cake. What can I say more about Nutella? It has always been a winner. 


Nutella-Banana Chocolate Cake

Same recipe as above except that the cocoa paste was replaced with about 120g of Nutella.

Sunday, 27 May 2012

Chocolate Cupcakes with Raspberry-Grapefruit Buttercream

For Mothers' Day! this post is self-explanatory......


Chocolate Cupcakes (adapted from Martha Stewart)

Ingredients:
  • 3/4 cup unsweetened cocoa powder
  • 3/4 cup all-purpose flour
  • 1/2 teaspoon baking powder
  • 1/4 teaspoon salt
  • 3/4 cup (1 1/2 sticks) unsalted butter, room temperature
  • 1 cup sugar (I reduced it to half cup)
  • 3 large eggs
  • 1 teaspoon vanilla extract
  • 1/2 cup sour cream
Method:
  1. Preheat oven to 350 degrees F. Line 12-cup standard muffin tin with paper liners.
  2. Into a medium bowl, sift together cocoa, flour, baking powder, and salt; set aside. 
  3. In a mixing bowl, cream butter and sugar until light and fluffy. Add eggs, one at a time, beating well after each, then beat in vanilla. With mixer on low speed, add flour mixture in two batches, alternating with sour cream and beginning and ending with flour.
  4. Pour batter into cups, filling each 3/4 full. Bake until a toothpick inserted in centers comes out clean, 20 to 25 minutes.
  5. Cool in pan 5 minutes; transfer to a wire rack to cool completely 
  6. Decorate as desired.
Raspberry-Grapefruit Buttercream filling 


Ingredients:
  • 1/2 stick butter, at room temp
  • 1 1/2 cups powdered sugar
  • Pinch of salt
  • 1/2 Tbsp grapefruit zest, unpacked
  • 1 1/2 Tbsp grapefruit juice
  • 1/2 tsp Marks & Spencer Bat's Blood
Method:
  1. Cream the butter, powdered sugar, salt, and grapefruit zest on high 3 to 4 minutes. Add the bat's blood and mix for another minute

Espresso Choco-Chips Biscottii

I thought long and hard before deciding to bake this. my first experience with making biscotti was not smooth. the dough was extremely sticky and slicing the hot half-baked dough was a challenge. however, i was going to meet my girlfriends and i wanted to make sweet treats for them. and because we were planning on meeting after work, i needed something that easily "portable" and "durable" that could at least last until i meet them. although cookies and muffins were good choices (if not for the delicate frostings on cupcakes, i would have done cupcakes; they are sooo pretty.....), i decided to go with biscotti because they can keep for long and are good snacks with coffee. my group of girlfriends are hardworking professionals whom i assume enjoy a cuppa coffee now and then. i had hoped that the biscotti would serve as their tea-time snack during their hectic work days. 


Espresso Choco-Chip Biscotti (adapted from sagerecipes)

Ingredients: 
  • 1 tablespoon instant espresso powder ( i used vietnam coffee powder)
  • 250g cups all-purpose flour
  • 1 1/2 teaspoons baking powder
  • 1 pinch of salt
  • 4 tablespoons unsalted butter, room temperature
  • 100g sugar
  • 2 eggs
  • 1/2 teaspoon vanilla extract
  • 1/4 cup mini chocolate chips 
Instructions
  1. Preheat the oven to 325ºF and line 1 sheet pan with parchment paper.
  2. In a small bowl, dissolve the instant espresso powder with 1 tablespoon hot water. Set aside.
  3. In a medium bowl, sift together the flours, baking powder, and salt. Set aside.
  4. Cream the butter and sugar, using an electric mixer, until light and fluffy, about 4-5 minutes. Mix in the eggs, one at a time. Mix in the espresso flavoring and vanilla extract. With the mixer on low, add in the flour mixture and mix until just combined. Mix in the chocolate chips just until incorporated.
  5. Divide the dough into 3 equal portions and form each portion into a log (2 inches thick). Do not flatten the logs (the dough will be sticky). Place the logs onto the sheet pan, a few inches apart from each other. Bake until golden brown, about 40 minutes.
  6. Remove from the oven and let cool slightly. Turn the oven down to 275ºF. Transfer logs to a clean cutting board. Using a serrated knife, slice the logs diagonally, 1/2 inch thick. Discard the end pieces (or munch on them). Place the cookies cut side down on the sheet pan and bake for another 40 minutes, until toasted and dry.

Saturday, 18 February 2012

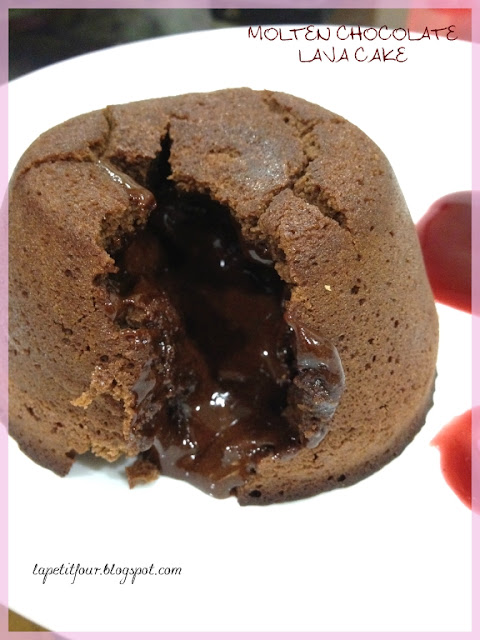
Molten Chocolate Lava Cake - a Valentine Sweet Treat

i love this dessert - anytime! already planned to make this for Dear on Feb 14th since sometime ago. 


hmmm. i wonder, actually, if this makes him or me happy, since I'm the one who likes it! this brings me to another thought which has been baffling me for some time. that is, sweet desserts are almost a must for Valentine's day celebration and baking sweet cookies/cakes/chocolates seem like a popular gift from girls to boys. but the thing is, it is the girls who likes those sweet treats, not the boys right? so.... why??? i suppose baking needs much effort and that's why... hope the boys appreciate those efforts from we girls!


anyhow, here's the much-liked molten chocolate lave cake..


Molten Chocolate Lava Cake (adapted from cake-o-cake.blogspot)


Ingredients (i used half the recipe for 2 ramekins)


4 oz dark chocolate, melted
4 oz semi-sweet chocolate, melted
4 tbsp salted butter, softened
1/3 cup cake flour
1/3 cup granulated sugar
3 eggs


Method:


1. mix the melted chocolate together
2. cream sugar and butter. add eggs one at a time, incorporating between each additions
3. add flour and mix until just combined
4. using a rubber spatula, stir in the melted chocolate into butter-egg-sugar-flour mixture. stir in big circular strokes
5. butter the ramekins generously 
6. fill the ramekins to the top with the batter
7. bake at preheated oven at 190degC for 15min or until edges are firm but centre still soft. entire top should be even in color.
8. cool for 10min before un-molding
9. un-mold the cake by quickly inverting the ramekins and allow the cake to slide out quickly
10. decorate as you wish


i was too excited in "presenting" the "gift" to Dear that i did not take more pictures of it....

Saturday, 7 January 2012

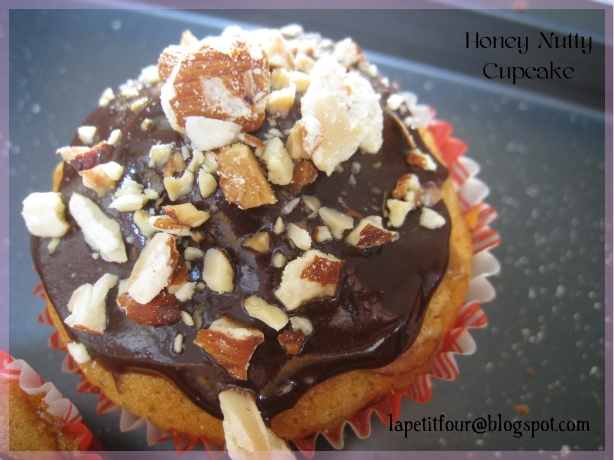
Honey Nutty Cupcakes

for a Xbox lunch party... 


my second try on this recipe.. simple and quick; great when you are time constrained...


Tuesday, 3 January 2012

New York Times Chocolate Chip Cookies

for subway cookies lovers, this gotta be THE recipe for you.. these cookies are soft and chewy and slightly bigger than subway's. personally, i prefer crispy cookies so i baked two batches of it - one batch soft & chewy and the other crispy and crunchy.


New York times Chocolate Chip Cookies (from the NYT of course!)


Ingredients:


2 cups minus 2 tablespoons (8 1/2 ounces) cake flour
1 2/3 cups (8 1/2 ounces) bread flour
1 1/4 teaspoons baking soda
1 1/2 teaspoons baking powder
1 1/2 teaspoons coarse salt
2 1/2 sticks (1 1/4 cups) unsalted butter
1 1/4 cups (10 ounces) light brown sugar
1 cup plus 2 tablespoons (8 ounces) granulated sugar
2 large eggs
2 teaspoons pure vanilla extract
1 1/4 pounds bittersweet disks or fèves, at least 60 percent cacao content  (see note below)
*Sea salt - i used the normal cooking salt. my recommendation is either use real sea salt or nothing at all


Method:


1. Sift flours, baking soda, baking powder and salt into a bowl. Set aside.
2. Cream butter and sugars together until very light, about 5 minutes. Add eggs, one at a time, mixing well after each addition. Stir in the vanilla. Reduce speed to low, add dry ingredients and mix until just combined, 5 to 10 seconds. Drop chocolate pieces in and incorporate them without breaking them. Press plastic wrap against dough and refrigerate for 24 to 36 hours. Dough may be used in batches, and can be refrigerated for up to 72 hours. - i froze my cookie dough for 24 hours instead; after mixing, i divided my cookie dough into balls (the way i would bake them), placed them on a greaseproof baking sheet and let them harden (uncovered) in the freezer before transferring them into a zip-lock bag for further storage. 
3. When ready to bake, preheat oven to 350 degrees. Line a baking sheet with parchment paper or a nonstick baking mat. Set aside.
4. Arrange the cookie dough balls on the baking mat, space them about 4 cm from each other. Sprinkle lightly with sea salt and bake until golden brown but still soft, 20-25 minutes (30 min for a crispier cookie). Transfer sheet to a wire rack for 10 minutes, then slip cookies onto another rack to cool a bit more. Repeat with remaining dough.


Saturday, 24 December 2011

Chocolate Bundt Cake

this is actually a pound cake in a bundt mold. wanted to try out something in preparation for Christmas! Hohoho!


sadly, the pictures cannot really show how great the cake actually tasted. most of the comments i gathered were really positive. to perfect it, go with vanilla/chocolate sauce or vanilla ice cream..


to those who have tried it, i really hope you will crave for more, because i shall be baking more of it for others to try. one of my most satisfied bakes till date. ;)


Chocolate Bundt Cake (adapted from Tish Boyle's The Cake Book)


Ingredients:


181g ---------------------- all-purpose flour
57g ----------------------- cake flour
92g ----------------------- dutch-processed cocoa power
2 1/4 tsp ----------------- baking powder
1/2 tsp ------------------- salt
340g --------------------- unsalted butter
500g --------------------- granulated sugar (i used only 380g)
4 large eggs
2 tsp ---------------------- vanilla extract
242g --------------------- sour cream (i replaced about 1/5 of it with plain yoghurt)


Method:


1. preheat oven to 163degC. grease the inside on a 10-in bundt pan and dust with flour
2. sift together flour, cocoa powder, baking powder and salt in a medium bowl and set aside
3. using an electric mixer, at medium speed, beat butter until very creamy (~2min). gradually beat in the sugar. increase speed of electric mixer to medium high and beat the mixture until well-blended and light (~4min)
4. reduce speed to medium. beat in the eggs one at a time, mixing well after each addition
5. stir the vanilla extract into the sour cream.
6. now add the dry ingredient into the butter mixture in 3 additions, alternating with the sour cream mixture in 2 additions, mixing until just well-blended (note: the flour mixture is prone to splatter during mixing. use a splatter shield on the mixing bowl if you have)
7. scrape the batter into the prepared pan and smooth the top
8. bake the cake for 75 mins, or until a cake tester inserted into the centre comes out clean. cool the cake in the pan on a wire rack for 15minutes. after that, invert the cake onto the rack and let it cool completely


Wednesday, 28 September 2011

chocochip almond nut biscotti

i have been wanting to make more biscotti since my first attempt, but the thought of the super sticky dough kinda put me off. despite so, i still bought nuts for biscotti making, because Dear mentioned he really liked biscotti. biscotti are ideal snacks for Dear cos he enjoys coffee and they can keep really well in air-tight containers, and so can be stored in his office.

i am so sure he is gonna love this one more... this batch of biscotti is more crispy than the previous ones. adding chocolate chips is an excellent idea.

ChocolateChip Almond Nut Biscotti (adapted from Good Housekeeping: Favourite Cakes, Bakes, & Cupcakes)


 Ingredients:

125 g ------------ plain flour, sifted
1/4 tsp ---------- baking powder
75 g ------------- golden caster sugar (i replaced it with 20 g brown sugar and 55 g white sugar)
pinch of salt
pinch of grounded cinnamon
1 tsp ------------ milk (i used 1 tsp milk powder)
1 ---------------- large egg, beaten with vanilla extract
1/4 tsp ---------- vanilla extract
25-30 g --------- almond nuts, chopped
25-30 g --------- chocolate chips

Method:

1. preheat oven to 200degC
2. pour plain flour into a big bowl
3. stir in baking powder, sugar, cinnamon and salt
4. create a well in the centre of the flour mixture and add milk, egg, almond nuts and chocolate chips in it
5. using a fork draw flour from the sides and mix until a sticky dough is formed
6. transfer sticky dough onto a flour surface and knead into a ball
7. roll ball into a 28 cm log shape dough and transfer to a non-stick baking sheet on baking tray. lightly flatten the top surface
8. bake in 200degC preheat oven for about 20-25 min, until top is browned
9. reduce oven temperature to 150degC
10. remove half baked dough from oven and transfer it onto a chopping board (dough is still very hot; you may allow it to cool for a while before transferring)
11. slice dough into 1 cm strips and place the strips (cut side up) back on the baking tray
12. bake at 150degC for another 15 mins or until slightly browned and dry


hmmm... something is missing. is it espresso? Americano? or in local context... KKOOOPPII-OOO KOOOOOSONg...

Sunday, 14 August 2011

Gone Nuts

Recently, work has been hectic. And so are my house renovation and wedding preparations. Weekends were burnt meeting with IDs.

Finally managed to find some time for baking this week!

In mood for cupcakes and nuts!

Honey-Nutty Cupcakes

Ingredients
  • 150 g unsalted butter 
  • 175 g self-raising flour 
  • 50 g caster sugar (I reduced to 40 g as I used honey in this recipe) 
  • 100 ml golden syrup (substituted with honey since I had no golden syrup) 
  • 3 medium eggs 
  • 1 tsp baking powder 
  • 1 tsp ground mixed spice (I used cinnamon) 
  • 50 g chopped nuts (I used almond) 

For the topping
  • 3 tsp double cream 
  • 1 tsp milk 
  • 50 g milk chocolate, finely chopped 
  • 50 g dark chocolate, finely chopped 
  • 75 g roasted chopped hazelnuts (I also used almonds) 

Method
  1. Preheat oven to 190degC. Line 12 muffin tin with paper muffin cases 
  2. Put the butter, flour, sugar, syrup, eggs, baking powder, mixed spice and nuts in a large bowl. Whisk the mixture using a hand held electric whisk until pale and creamy. Divide the mixture equally among the paper cases 
  3. Bake for 20 mins or until risen and golden. Leave in tin to cool for 5 mins and then transfer to cooling rack to cool completely. 
  4. Heat the cream and milk in a small saucepan until near boiling. Put both chocolates into a bowl and pour the hot cream over them. Leave to stand for 5 mins and stir until smooth 
  5. Put the hazelnuts into a shallow bowl. Dip the top of the cake into the chocolate cream, allow excess to drip off then dip into the nuts until coated all over. Stand the cakes upright on the wire rack and leave for about 1 hour to set. 


Friday, 5 August 2011

A 21st Birthday Cake


Nah... It is not my birthday cake. I wished I am still 21 years old!

By this time as I blog, I would have completed a REAL Birthday Cake for a fabulous girl who is throwing her 21st birthday party today! Whee~

When I was first asked to do a birthday cake for a party, I felt stressed and honoured at the same time. But, I think I was more stressed. LOL. I am still baking as a hobby. Baking for a big event was a big challenge. What’s more, it is her 21st birthday. I must say, her simple request really boosted my confidence.

Well, luckily, the birthday girl already knew what cake she wanted. She wanted the Devil's food cake with chocolate frosting I did for Dear on his birthday. This made my job a lot simpler. All I needed to do was to practice more and think of suitable cake decorations.

Devil's food cake frosted with Ganache by itself is already presentable. It has the "whatever goes" kind of feel... the frosting need not be perfectly smoothed out, as long as it is not too messy.

Yes, the devil's food cake is the same devil's food cake as my previous blog entry. This time, I made two recipes - two stacked layers with chocolate frosting between the layers.

Chocolate Ganache Recipe
  • 10oz ------------- bittersweet or semisweet chocolate, chopped (I used Hershey's. a cheaper alternative is Van Houten but it is sweeter) 
  • 1/2 cup ---------- water or cream (I use water as cream would make the Ganache too rich) 
  • 170 grams ------- butter, softened
Method
  1. Melt chocolate and water in a heat proof dish over simmering water. Stir occasionally until all chocolate is melted. 
  2. Stir in chopped butter until the chocolate-butter mixture is smooth. 
  3. Leave it to cool until spreadable. This could take 1-2 hours, according to recipe. (But given Singapore's warm climate, I had to chill it for half an hour even after cooling at room temperature) 
 Given my worse-than-amateur cake decorating skills and using "whatever goes" Ganache frosting as leverage, I decided not to take risk for today and kept the design simple. I needed to deliver my promise to the birthday girl.


Thursday, 28 July 2011

Devil's food cake turned into brownies

Chocolate lovers should never miss the devil's food cake. Devil’s food cake as compared with typical chocolate cakes is more moist and airy but equally, or if not, more chocolate-y! The difference lies in using cocoa powder instead of chocolate.

Devil’s food cake is meant to go with a rich chocolate frosting. My first devil's food cake was accompanied with a rich chocolate frosting. It was Dear's birthday cake.

Due to time constraint, I omitted the chocolate frosting this time round and made bite-size devil's food cake. It turned out to be like brownies, except much more airy. It is definitely no less chocolate-y than brownies. Promise!

Recipe is adapted from David Lebovitz.

Devil's food cake

Ingredients for cake
  • 9 tbsp unsweetened cocoa powder 
  • 1½ cups cake flour (not self-rising) 
  • ½ tsp salt 
  • 1 tsp baking soda 
  • ¼ tap baking powder 
  • 4 oz (1 stick) unsalted butter, at room temperature 
  • 1½ cups granulated sugar 
  • 2 large eggs, at room temperature 
  • ½ cup strong coffee (or water) 
  • ½ cup whole or low-fat milk 
Ingredients for Ganache frosting
  • 10 oz--------------------bittersweet or semisweet chocolate, coarsely chopped 
  • ½ cup-------------------water (or cream) 
  • ¾ cup (1½ sticks) ----unsalted butter 
Method:
  1. Adjust the oven rack to the center of the oven and preheat the oven to 350 degrees. 
  2. Butter two 9″ x 2″ cake pans and line the bottoms with circles of parchment paper. 
Making the cake:
  1. To make the cake layers, sift together the cocoa powder, cake flour, salt, baking soda, and baking powder in a bowl. 
  2. In the bowl of a standing electric mixer, or by hand, beat together the butter and sugar about 5 minutes until smooth and creamy. Add the eggs one at a time until fully incorporated. (If using a standing electric mixer, stops the mixer as necessary to scrape down the sides to be sure everything is getting mixed in.) 
  3. Mix together the coffee and milk. Stir half of the dry ingredients into the butter mixture, add the coffee and milk. Finally stir in the other half of the dry ingredients. 
  4. Divide the batter into the two prepared cake pans and bake for 25 minutes, or until a toothpick inserted into the center comes out clean. Cool completely before frosting. 
Make the frosting
  1. To make the frosting, melt the chopped chocolate with the water (or cream) in a heatproof bowl set over a pan of barely simmering water, stirring occasionally until melted. Remove the bowl from the pan of water. 
  2. Cut the butter into small pieces and whisks them into the chocolate until completely melted and the Ganache is smooth. Cool until spreadable, this may take about 1 hour at room temperature. Longer time is needed for tropical countries. 
Frosting the cake:
  1. Run a knife around the inside of each of the cakes which will help release them from the pans. Tilt one cake out of the pan, remove the parchment paper from the bottom and invert it back onto a cake plate. Spread a good-sized layer of icing over the top. Top with the second cake layer and spread the top and sides with the remaining icing as decoratively as you want. 


Thursday, 14 July 2011

A rare birthday cake

I was elated when my colleagues suggested that I could bake a cake for a little surprise party that we were planning for our birthday colleague (the usual practice was getting a gift and buying a cake). Not only was there a greater motivation for me to bake, I felt kind of touched that my colleagues trusted my baking skills and didn't mind. It mattered so much to me; it was a form of recognition, no matter how small it might seem. That was two days ago.

Yesterday, I was on medical leave. The flu bug hit me the night before. But I was still determined to bake a birthday cake for the birthday girl. And so I did! It was a rare birthday cake because I made a chiffon cake for her! Birthday cakes, as everyone knows it, are often elaborated with coloured frostings or whipped cream, well-piped wordings and decorations and/or topped with candied/fresh fruits. Mine was absolutely simple - dark chocolate chiffon cake with chocolate rice & almond nuts.

Though still drowsy from my flu medicine, I somehow thought it was a breeze to go to work today even with a big cake container. Maybe it was the drowsiness that made me oblivious to the peak hour crowd. But more likely I think it was because of the cake that I was holding. Regardless, I think my colleagues enjoyed it. Or did they not? Erm... I think they did. ;)

I am nothing but grateful for my colleagues who are always appreciative of my bakes and generous with words of compliment.


Dark Chocolate Chiffon Cake

Ingredients A

  • 50 g Cake flour
  • 20 g Cocoa powder
  • 10 g Corn flour
  • 60 ml Chocolate milk (I used normal milk)
  • 1/2 tsp Instant coffee (I omitted)
  • 50 ml Corn oil (I used canola oil)
  • 4 Egg yolks
  • 1 tsp Chocolate paste (or black forest paste)


Ingredients B

  • 4 Egg whites
  • 60 g Sugar
  • 1/2 tsp Cream of tartar (I substituted it with salt)

Method for A

  1. Heat chocolate milk and instant coffee powder until the latter dissolves. Set aside
  2. Whisk egg yolks, add milk, corn oil and continue to whisk till well-mixed
  3. Add in the sifted flour/corn flour and mix till batter resembles a thick paste

Method for B

  1. Whisk egg white and cream of tartar till bubbly
  2. Add in sugar a little by little and continue to whip until soft peaks form
  3. Fold in 1/3 of egg white into chocolate batter
  4. Pour chocolate batter into the rest of the egg white and continue to fold in gently
  5. Pour batter into chiffon pan
  6. Bake in a preheated oven of 160degC for 45 min